#01566 Soviet KV-1S Heavy Tank
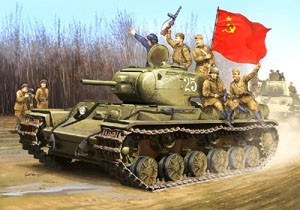
Built from the box, this kit represents a KV-1S from the spring or summer of 1943, with all-steel road wheels with eight small lightening holes, the later style turret casting and handrails on both upper hull and turret. With some effort and after-market parts, you can back-date it to depict an earlier production example from the fall of 1942 or winter of 1942/43.
The kit uses Trumpeter's new KV-1S hull tub and hull sides with the 12-degree slope on the roof of the transmission compartment. Dr Božidar Šarler has brought to my attention some discrepancies in the length of the hull. The sloped transmission compartment roof plate is some 5mm short compared to published drawings.
Basic hull assembly is similar to earlier Trumpeter KV's, with the separate hull sides being added to the lower hull tub. The main hull components are common to this kit and to the SU-152 kit #05568.
The kit provides circular mounting plates for the front and rear towing eyes, which is appropriate for the entire KV-1S production run. You are given the option of styrene or etched brass parts for the exhaust air deflector plate beneath the rear hull overhang, and the kit includes an etched brass screen to cover the exhaust outlet immediately above the deflector plate.
The kit includes all-steel reinforced road wheels with eight small lightening holes, which are appropriate for a KV-1S from the spring or summer of 1943. If you wish to backdate your model to represent an earlier production example, several aftermarket manufacturers offer alternative wheels in different patterns. The kit's drive sprockets are the correct late pattern with eight bolts securing the convex hub.
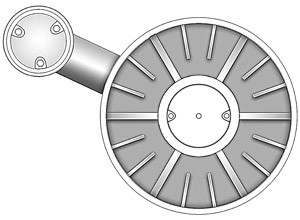
The suspension swing arms are the correct late pattern with three retaining bolts for the torsion bar caps, but the kit provides no guidance for aligning the caps with the arms. The drawing below is taken from KV - Technical History and Variants and shows the correct orientation. Note that the drawing shows the earlier reinforced steel road wheel, not the later pattern with lightening holes as seen on the KV-1S, SU-152 and KV-85. The alignment of the retaining bolts however, is the same.
The kit provides individual link tracks that represent the split-link pattern seen on most KV-1S vehicles, but the tracks are incorrect in width, scaling out at 700mm wide rather than the 650mm which is correct for a mid- or late production KV-1S. For accuracy, you should replace the tracks with aftermarket items. Numerous suitable sets are available including Friul ATL-54, Masterclub MC135028W, Miniarm B35018, Modelkasten SK-14 and Spade Ace SAT-35023.
The kit includes an applique armor plate for the lower front hull. This applique armor is not evident in most photographs of the KV-1S, but check your references for the specific vehicle you are modeling.
The kit provides the correct all-welded nose plate, and includes an etched brass part for the rain guard above the driver's visor. This must be carefully bent to shape and aligned with the molded-on weld bead on the upper front hull plate. The driver's episcopes, headlamp and siren are correct for a KV-1S though some later production examples carried a different siren similar to those carried by Lend-Lease vehicles.
The kit provides styrene radiator intake screens with integrally molded mesh. While the representation of the mesh is quite good, you may wish to replace the screens with aftermarket items for a more realistic appearance. As with previous kits, Trumpeter has molded the louvres beneath the mesh into the engine compartment roof plate.
The driver's hatch and transmission maintenance hatches feature a raised lip around their circumference. Photographs of the KV-1S show that this type of hatch was commonly fitted.
The engine access hatch is of the domed type which is evident in most photographs of the KV-1S, but the kit part features a raised flat disc in the center of the dome, surrounding the cover for the pressure relief valve. I have not been able to find any evidence of this feature on the real vehicle. I therefore recommend that you replace the hatch (part WG3) with an aftermarket item or another hatch from the spares box. Trumpeter's earlier kits #00358 and #00360 provide optional flat and domed hatches, so you may be able to source a replacement hatch from one of those kits.
The kit provides the early pattern unarmored exhausts, which again are appropriate for a vehicle from the spring or summer of 1943. A few late production KV-1S's carried the shortened armored exhausts that were also fitted to the SU-152 and KV-85. If you wish, you can replace the kit exhausts with those from Trumpeter's SU-152 kit #05568 or with aftermarket exhausts from Moskit.
The pattern of the bolts on both the engine compartment roof plate and transmission compartment roof plates is incorrect for a KV-1S. For an accurate representation, you should shave off the bolts from the kit parts and reattach them in the correct configuration using the drawings in KV - Technical History and Variants as a guide.
The kit also provides armor fillets at the forward corners of the engine compartment roof plate. These were seen on a few KV-1S vehicles but were typically fitted in conjunction with a V-shaped fillet forward of the turret race. Check your references for the vehicle you are modeling and modify the kit parts accordingly.
The fender brackets provide the correct four attachment bolts to the fenders themselves, and lack bolts attaching them to the hull sides. This is correct since the brackets were welded to the hull on the KV-1S. The kit provides a full set of solid brackets which is correct, though some photographs show vehicles with a mix of solid and skeletal brackets so check your references for the vehicle you are modeling.
The kit includes applique armor plates for the upper hull sides to protect the turret race. These are evident in some photographs but not all so again, check your references.
The kit includes six 90-litre cylindrical fuel/oil tanks but the instructions direct you to use only four for the number 7, 8, 9 and 10 fender positions. These are all aligned with the outer edges of the fenders which is appropriate for a spring/summer 1943 production example. If you wish to depict an earlier vehicle, you must reposition the forward pair of tanks slightly further inboard. The instructions omit the oil tank (identical to the fuel tanks) fitted to the number 5 position, though the parts are included in the kit. You will need to open up the locating holes in the underside of the left-hand fender (part WG5) to accommodate the additional tank. Note that the KV-1S did not carry a tank on the number 6 position so do not open up the corresponding holes on the right-hand fender.
The kit also lacks the long rectangular stowage box fitted to the number 7 fender position, inboard of the fuel tank, and the spare track links fitted on the number 5 and 6 positions. You must source these from your spares box or from aftermarket sources.
The kit includes braided brass wire and styrene ends for the two tow cables, along with the tow shackles and turnbuckles to attach these to the hull. The cables represent the later pattern with cast steel ends, appropriate for a KV-1S.
The kit turret is molded in two halves, left and right, with a separate roof plate. The base of the commander's cupola is molded integrally with the roof plate. This configuration of the parts leaves a seam down the rear face of the turret that must be filled and the cast texture restored. This should not be beyond the skills of most modelers.
The turret depicts the later casting pattern, appropriate for a mid- or late production KV-1S. Early production vehicles featured a diagonal casting seam on the forward turret sides. If you wish to depict such a vehicle, you can modify the kit parts to remove the existing seams and add the new one from styrene rod softened with liquid cement and textured with a hobby knife.
The upper forward corners of the turret shell are too high and result in a 'step' where the turret casting joins the trunnion cheeks. You must sand the upper corners of the turret shell to achieve the correct contours.
The commander's cupola is located in the correct position on the turret roof and features the correct five episcopes, which are provided as separate parts. The roof of the cupola is a separate component. However, the upper portion of the cupola is undersized; it should extend outward to the edges of the base. The small dome in the center of the cupola also appears a little undersized and lacks the cast texture evident in photographs. Some additional texturing with Mr. Surfacer will help to enlarge it slightly and improve its appearance.
Three lifting hooks are included for the turret. These hooks were introduced in March 1943, and are appropriate for a vehicle produced from that time onwards. If you wish to depict a vehicle manufactured prior to March 1943, you should omit the hooks and remove their molded-on base plates from the turret.
The kit provides hand rails for the turret sides and rear. These hand rails were present on the KV-1S prototype but were omitted from early production examples, then reintroduced again on vehicles manufactured after December 10, 1942. However, the kit provides a single curved hand rail for the right-hand side of the turret and two small hand rails for the left-hand side, of a similar style to those fitted to IS-2 turrets. The only examples I could find of these small rails were on a preserved turret in Moscow, which has been "restored" with fabricated replacement parts, and on the KV-1S-85 prototype in Kubinka. I have been unable to find photographs of these hand rails on KV-1S's in service. Most KV-1S's appeared to have a single curved rail on the left-hand side, similar to that on the right-hand side. I recommend replacing the kit hand rails with a single curved rail similar to that on the right-hand side of the turret, using the scale drawings in KV - Technical History and Variants as a guide.
The kit provides optional gun barrels for the main armament - either a turned aluminum barrel or a one-piece slide molded styrene barrel. Both items are the correct scale length.
The kit includes an applique armor plate for the front of the mantlet, which is evident in some photographs of the KV-1S. Check your references for the vehicle you are modeling.
In summary, the kit is not without its faults, and will require some modifications and aftermarket items to represent an accurate KV-1S. That said however, it requires far less work than the old Eastern Express kit to arrive an accurate model and with some work, you can produce an outstanding result.
